Wednesday, June 26, 2013

Guest Book Ideas

1. Readers? I think a vintage library card guest book is so creative! Etsy no longer has this available, but you could always DIY. Purchase the cards and pockets online and use a glue stick to adhere. Have people leave you messages and sign their pocket:

library-card-wedding-guest-sample

2. Enjoy hosting game nights? I think this is such a great idea. Not to mention that every time you play Jenga! you will be reminded of your special day. Grab some chalkboard paint and an inexpensive vase and you have a place for signed blocks!


jenga-guestbook-ruffled
 
3. This is another useful guest book idea that you can use and cherish forever. A guest book that can also keep you warm! It can be made in your wedding colors and hung to be written upon. Great for a rustic outdoor / barn wedding. 
 
Cute guest book idea too
 
4. Postcards may just be one of my favorite ideas yet. you could set up vintage postcards for guest to write you a short note or advice and then have a family member or a friend mail out a postcard every month or so. Or you could even store them in a box as a time capsule and open it up on your 1st (or 2nd, 5th, etc.) anniversary. I was recently at a wedding with postcards where they incorporated them into the centerpeices. Adorable!

postcard-wedding-guestbook

5. Here is another creative guest book idea that you could frame on your wall. Puzzles come in all sorts of shapes, sizes and colors so you could really make the puzzle as unique to you and your wedding as you would like. Check out Bella Puzzles for custom designs.

puzzle-wedding-guestbook

6. I love these little stones for guest to sign. Plus you could incorporate them into your home decor nicely. wine corks could be substituted for stones.

stones-wedding-guestbook
 
7. Want a fun way to incorporate a photobook without breaking the bank and have a hysterical guest book? Have guests take goofy photos and sign them. Plus you could set up a small chalkboard sign for guest to write notes or advice on that they can use in the photos as well.

poloroid-wedding-guestbook
 
8. Love to travel or having a destination wedding? Buy a globe and paint it white. use an old map (can make one look old by staining it with coffee or tea and cut out a monogram, word, etc. and have guests sign it.

diy-painted-globe-wedding-guestbook
 
9. Purchase old vintage keys online and ask that guests take a key, attach a tag and pin it to a board. Ask them to share their KEY to succes, happiness, or whatever works for you as a couple.
 
Fun guest book idea.
 
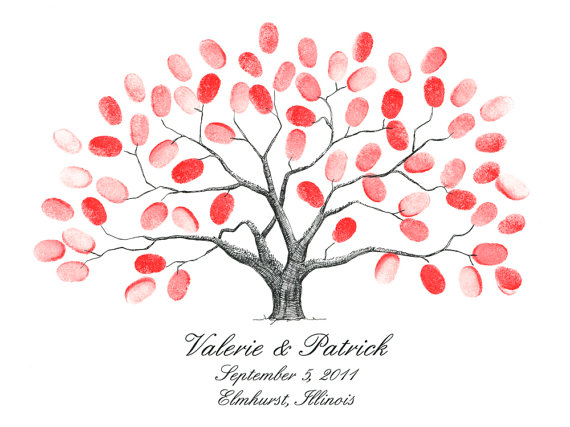
10. Whether fingerprints become leaves, balloons, or even sprinkles on a cupcake these are a cute way to let the ones you share your day with know that they have left an impression on your celebration.


xOxO - M

Tuesday, June 18, 2013

Herb Infused Olive Oils


Start with the best ingredients you can find or afford. For example, using good quality olive oil, fresh herbs, and organic ingredients will give you a stronger and cleaner flavor in your infused olive oil.

This is the perfect thing to do this time of year while your herbs are thriving outdoors.
Wash all herbs going into your oil and pat them dry as much as possible. Bacteria can not grow in  olive oil itself, but it can grow in the water left on the ingredients going into the oil.

2009_06_01-Bottles.jpg

When considering your container or bottle make sure you have something that has a good seal on it. Canning jars work well for this, but if you are looking for something a little more high end check out an Ikea Slom Bottle (pictured above is available for $1.99 in stores.) Just like the ingredients, be sure to wash and dry your containers thoroughly.

Bruise your herbs and put them in your container. Cover the ingredients with olive oil and seal the bottle. Build flavor by placing filled containers in a cool, dry and dark place for 1 - 2 weeks prior to use. Strain out the solid ingredients and re-bottle the oil once the flavor is to your liking.


Don't have 1 - 2 weeks to wait? Heat oil and ingredients in a sauce pan over medium-low heat (ideally cook to 180°), let oil cool, and then strain out the ingredients before bottling. This method not only cuts down on time, but also reduces the risk of bacteria growth.

Botulism is always a concern when infusing an olive oil. Infused olive oil will keep longer in the refrigerator (about a month.)

xOxO - M


Saturday, June 15, 2013

Wine and Lilly Guest Blog: Whitney Wilder

Hello Confessions of an Entertaining Hostess readers! My name is Whitney and I am honored Meredith invited me to guest post on her blog today! I just love all of Meredith’s clever and classy party ideas, because let’s be honest…entertaining is hard work! But…there is nothing better then the perfectly-put-together get-together! I made these Lilly fabric wine glasses for a bridal shower my mom and I recently hosted. I think these glasses went perfectly with the “beachy” theme without going overboard!


Supplies you will need: 
Fabric (I cut up old Lilly pants to use but any bright and fun fabric will work!)
Wine glasses
Tacky glue
Sponge brush
Sharp scissors
X-Acto knife
Paint brush
Varnish / sealant
Sharpie pen or fabric marker

Step 1: Making Tacky-Glue adhesive: (2 parts Tacky Glue with 1 part water)
Use sponge brush to mix water and glue together. This takes some time because the tacky glue is so thick.
 *To be honest I never measured exactly. I just mixed until the glue was translucent (rather than white) when applied to the glass and I made sure mixture felt “gummy” between my fingers.

Step 2: Cut Fabric
Using the bottom of your wine glass as guide, use marker to draw a large circle around the base onto the fabric. It is important that your fabric circle is larger than the wine glass bottom so the fabric sticks to the glass.


Step 3: Apply fabric to wine glass!
Using the sponge brush paint a layer of the tacky glue mixture onto the base of the glass and place fabric so that the design will show through.43 Then apply mixture to back of fabric, making sure to soak the entire fabric circle with glue. (The excess fabric will dry paper-like and fabric will not fray as you cut it!)  

Step 4: Remove air bubbles (Helps fabric stick to glass & prevents wrinkling)
Using you finger, start at the middle of the glass base and drag your finger towards the edge ensuring all air bubbles get removed. Helpful hint: As you remove air bubbles, flip glass right-side up and you will be able to see the air bubbles so you don’t miss any!

Step 5: Let dry & apply finishing coat
Allow glasses to dry upside down for about four hours. Before you remove excess fabric, apply 1 coat varnish of choice to fabric. When that varnish coat dries, remove excess fabric cutting as close to the glass as possible. Then apply another coat (or two) of varnish.

Step 6: Remove excess varnish and glue
Using the X-Acto knife, remove excess varnish or glue that may of accumulated on the sides of the glass base. I also used the X-Acto knife to trim any excess fabric from base of the wine glass.


Not many things I love more then Wine & Lilly! Happy crafting! –Whitney

(Thanks so much for letting me share this Whitney! You are the best! xOxO - M)

Wednesday, June 12, 2013

Companion Planting: High School For Veggies


Keeping up with who gets along with who in the garden tends to remind me of high school for all the wrong reasons. Cracks me up... Here's how to keep your veggies from mauling one another in the halls.
  • Beans get along with most veggies, but beans and onions do not get along.
  • Broccoli and cabbage love beets, chard, celery and spinach. Onions are happy here, too.
  • Carrots do well with peas, tomatoes and lettuce, but keep dill at the other end of the garden.
  • Cucumbers like to be near beans, peas and radishes, but far from potatoes.
  • Tomatoes will thrive near cucumbers, carrots and onions.
So, may you plant your veggies at the right lunch table and avoid the drama all together.

Monday, June 10, 2013

Magic Trick - Corn


When I discovered this magic corn cooking trick I simply couldn't keep it to myself! I was ecstatic  because there is next to no cleanup, I don't have to spend time trying to get the silk off of the corn, and the overall cook time is shorter. (additional bonus: This doesn't boil all of the nutrients out of the corn.)

Are you ready for this? Check it out:


1. Remove the outer husks that might be a little dirty.


2. Cut the bottoms off of the stalks. Be sure to cut above the part of the cob where the husk is attached. (That would be above the part of the cob where it starts to round down.)


3. Place a damp paper towel on the bottom of the microwave.

4. Use this guide for your cook time. Cook times can vary a little.

1 ear: 2 mins.
2 ears: 3 to 4 mins.
3 ears: 5 to 6 mins.
4 ears: 7 to 8 mins.
6 ears: 8 to 9 mins.

5. After cooking, let the corn sit about 2 minutes.


6. Pick up corn by the top (oven mits are your friend here) and squeeze and lightly shake out the ear of corn. It should slide right out clean of any silk or husk.


Chew on that! (I'm available for birthdays and weddings)

xOxO - M

Friday, June 7, 2013

Throwing Shade: Tent your Event


The next time you are having a tented event think outside the box. Throwing shade never looked so good!


When thinking about tent size, consider guest count, venue and event. Does your catering team need a prep tent? Will you need space for rest rooms? DJ? Bar? Do you want several smaller tents for an outdoor pool, beach or garden party?

- Cocktail parties you’ll want 6-8 sq. ft. per person with seating for 50% of your guests.
- Sit down dinner using round tables for ten, about 12 sq. ft pp. with seating for 100%.
- Dance floors usually about 3sq. ft. pp.


xOxO - M

Thursday, June 6, 2013

Do-It-Yourself Fire Pit


If you are anything like me you love a good fire pit. They allow you to stay outdoors later into the evening and fight off those pesky mosquitoes. Ever wish you could afford one that looked custom built? One that didn't rust in the outdoor weather? Here is an easy way to save mega bucks and have your neighbors wanting to put in orders. Check it out:

Location! Location! Location!
Fire pits should be placed on a flat, level area at least 25 feet from any tree. Since fire pits are strictly enforced by local building codes you are going to want to follow the rules on this. Know the codes in your area before you build. This fire pit will be about 2' tall, with a 5' exterior diameter with a 3' interior diameter

Foundation
1. To mark the center of your firepit hammer a rebar (available at any home improvement store for about $2.50) into the ground.
2. Then mark the circumference of the circle. One easy trick is to attach a string 2.5' in length to the stake, pull it taut and spray paint the circumference.
3. Dig the inside of the circle 6 inches down. Then use the same method as listed above to mark inner circle, 1' in from the outside circle. The inner circle will be the edge of the fire pit wall.
4. Mix concrete with water until it reaches a peanut butter like consistency. This will help your foundation stones to sit up. Lay the concrete in between the two circles so it is level to the ground.
5. The inner circle should be free of concrete to allow for drainage. build up concrete until it is about 1-1.5" below ground level.
6. Use a damp towel to smooth the surface and let try for 24 hours.

Building Outer Wall
1. Mix mortar and shovel approximately 2" of it on top of the concrete base. Lay the stones on the mortar. You want to make sure your stones are matching the slight curve of your outline.
2. Repeat. As the first few levels of stones begin to take shape, begin to lay fire bricks to firm the inner wall of the structure.

Building Inner Wall
1. Continue to raise both the bricks against the inside circle and the stones against the outside circle, filling in any gaps between with stones and mortar as the wall increases in height. Staggering the stones and bricks makes the structure stable and is aesthetically pleasing. Use a joint to remove excess mortar from in between stones.
2. Lay a cap of flat field stones on top of the wall using approx 1" of mortar so they adhere. Make sure the top is flat and level.

Finishing Your Fire Pit
1. Using a paintbrush, brush the inner circle of the fire pit to release any extra debris. Then water the whole thing down with a hose.
2. Spray the inside bricks black using high heat stove paint.
3. Fill the pit with a generous layer of river rocks.

For instructional video, pictures, and materials list CLICK HERE

xOxO - M

Monday, June 3, 2013

Cookie Jar: Smores Cookies


Break out the sticks, flames, marshmallows, chocolate bars, graham crackers and what do you end up making besides a big damn mess? S'mores! If you are having a cookout this weekend and do not want sticky fingers and melted chocolate all over your patio furniture here is the tasty solution: S'mores Cookies! Don't knock 'em until you try 'em. They are mess free and full of toasty goodness! Yummm!

Ingredients:
1/2 Cup Old-Fashioned Rolled Oats
1 Cup All-Purpose Flour (Spooned and Leveled)
1 Cup Whole Wheat Flour (Spooned and Leveled)
3/4 Teaspoon Ground Cinnamon
1/2 Teaspoon Baking Soda
1/2 Teaspoon Salt
1 Cup (2 Sticks) Unsalted Butter, Room Temp.
3/4 Cup Light-Brown Sugar
1 Large Egg
8 Ounces Bittersweet or Semisweet Chocolate, Cut into 30 Squares
15 Large Marshmallows, Halved Horizontally

Directions
1. Preheat oven to 350 degrees. In a food processor, pulse oats until finely ground. Add flours, cinnamon, baking soda, and salt; pulse to combine. In a large bowl, using an electric mixer, beat butter and sugar until light and fluffy. Beat in egg. With mixer on low, beat in  flour mixture just until combined.
2. Drop dough by tablespoons, 1 inch apart, onto two baking sheets. Top each with a chocolate square. Bake just until lightly golden (approx. 11-13 mins) rotating sheets half way through. Remove sheets from oven; heat broiler. Top each cookie with a marshmallow. One sheet at a time broil until marshmallows are lightly browned (1-1.5 mins.) Transfer cookies to wire racks to cool.

(Above recipe from Martha Stewart)

xOxO - M

Sunday, June 2, 2013

False Cake Tiers Money Saver

Looking for a way to have your cake and eat it too? Here is a cost effective way to affording the designer cake your dreams without going broke. They are called false tiers and consist of cake forms covered and decorated to look like the other tiers of cake. The trick is to ask that your bottom and top tiers be made of real cake. That way you will be able to cut the cake and save the top tier for your anniversary. For serving, order sheet cakes from the same bakery to be cut and distributed to guests. With the average wedding in 2012 costing over $28,000 (according to theknot.com) sometimes its nice to have a tip that will save you some coin.

image of Wedding Cakes

xOxO - M

Saturday, June 1, 2013

Make-Your-Own Bloody Bar


My Make-Your-Own Mimosa Bar post got some pretty good feedback so I wanted to get this complementary idea out there as well, Make-Your-Own Bloody Bar! Combine any or all of these fun ingredients, put out Old Bay-rimmed Glasses and Enjoy!

Here is what you will need:
  • 1 Glass Bottle of Vodka 
  • 1 Smaller glass bottle of Tequila (If Bloody Margaritas are preferred)
  • 1 Pitcher of Home-made Bloody Mix (Mix the below ingredients together except for the Tomato Veggie juice. It should yield approx. 1.25 cups of mix. Put the two out separately so guests can add as much of the stronger ingredients or as little as they like. Typically people will want to follow a 1/2 cup of mix for every quart of juice. Add preferred alcohol or drink virgin  
    • 3 Tbsp Dijon Mustard
    • 3 Tbsp Worcestershire Sauce
    • 2 Tbsp Prepared Horseradish
    • 2 Tbsp Hot Sauce
    • 2.5 oz Lemon Juice (or 2 Lemons)
    • 1.5 oz Lime Juice (or 2 Limes)
    • 2 Tbsp Olive Brine
    • 1 tsp Celery Seed
    • 2 tsp Fresh Ground Black Pepper
    • 2 tsp Sea Salt
    • 64 oz Tomato Vegetable Juice ( Trader Joe's has a great one!)
  • Steamed, Peeled and De-Veined Shrimp
  • Celery Stalks
  • Green Beans
  • Hot Peppers
  • Baby Tomatoes
  • Green Olives
  • Basil leaves
  • Lemon Slices
  • Lime Slices
  • Radish Slices
  • Multicolored Baby Tomatoes
  • Cucumber Slices 
  • Old Bay Seasoning
  • Hot Sauce
  • Pepper Grinder
  • Toothpicks
  • Flavored Ice Cubes
    • Cucumber-Basil - In a blender, puree the below ingredients with 3 cups of water. Strain through a fine sieve into two ice cube trays. Freeze 3 hours.
      • 2 1/2 Cups Chopped Cucumber
      • 3/4 Cup Lightly Packed Basil Leaves, Torn
      • 1 Serrano Chile, Seeded and Chopped
      • 1 tsp Light Brown Sugar
      • Kosher Salt
    • Tomato-Chile - In a blender, puree the below ingredients. Pour into two ice cube trays. Freeze 3 hours.
      • 3 Cups Tomato Juice
      • 1 Jalapeno, Seeded and Chopped
      • 1/4 Cup Lightly Packed Dill
      • 1/2 tsp Tabasco 
      • Kosher Salt
xOxO - M